-->

W E L C O M E

Related Posts Plugin for WordPress, Blogger...

Showing posts with label Computer. Show all posts

Saturday, 21 March 2015

Flipkart Pays You When Your Friends Purchase From Flipkart

Yeah you heard me right. You Get Money When Your Friend Purchase From Flipkart.

But How, Flipkart Sells The Goods so They Get Money. Your Friend purchase The Product So He Pays The Money. But What Is You Role ? Why Flipkart Will Pay You ?

what is Flipkart Affiliate Program ?
The Flipkart affiliate program is a great way for you to earn commissions by placing product banners or links on your website to refer users to the Flipkart.com website. You can earn up to 15% every time a user clicks on the banner/link and makes a purchase on Flipkart site.
Commissions keep on changing every month so go to http://www.flipkart.com/affiliate/commissions to check updated commisions for particular product.

How To Get Flipkart Affiliate Account?
To make money through Flipkart, you don’t need to be a seller, you just need Flipkart’s affliliate account. Just read the below instructions and find how to get your own Flipkart affiliate account.
  • Go to http://www.flipkart.com/affiliate and create an affiliate account for you by clicking the “Register” button. The account created now is different from the other account you used to buy products from Flipkart. Affiliate account is only to earn commissions, and you can’t purchase using this account.
  • Enter the required details like Email address, password, agree the T&C and click the”Register” button.
9-14-2014 1-54-44 PM
  • After registering, you will be asked to fill in your contact details like address, phone number, website information and payment method.
  • If you don’t have a website,Create blog, www.blogger.com offers this for free.
  • At present there is 2 sorts of Payment alternatives as under beneath:
    • EFT (Electronic Fund Transfer) – Recommended
    • Gift Voucher
    When you chose Gift Voucher option, you’ll claim your income when you make Rs. 250/- in commissions. And if you choose EFT as the payment option, the income will be transmitted to your bank account only after you earn atleast Rs. 2500/-.
  • Once finished entering the required details, click the “Save changes” button in the bottom of the page.
  • That’s it! Your Flipkart affiliate account is ready to earn money.

How to generate affiliate link for the product ?
Money making process doesn’t ends once you created an affiliate account. You should make people to buy products using your affiliate ID. If you refer a product to others without generating affiliate ID you won’t earning anything. Before referring a product convert the normal link into an affiliated link. Read the below instructions and find how to generate affiliate URL.
9-14-2014 1-32-09 PM
9-14-2014 1-36-45 PM
  • Now, paste the copied URL in the toolbar and click “Generate” button.
9-14-2014 1-35-28 PM
  • Once the affiliate URL is generated, click the “Select” button and copy the URL. And now you can share the product’s affiliate URL to whom ever you would like to refer.
9-14-2014 1-41-16 PM
  • To make sure that the URL is your affiliate link, check whether there is “affid=YOURAFFILIATEID” at the end of the URL. If not so, you should regenerate once again or just add &affid=YourAffiliateID.
  • Here’s a sample affiliate URL, which has my affiliate ID at the end
http://dl.flipkart.com/dl/do-bhai-9668/p/itmdunfnfxrymebw?pid=SHODUNFNSNBA4XZB&sizeSelected=true&affid=jaincheta
  • That’s it! Get started with your Flipkart affiliate account and earn some money.
NOTE: Don’t forget to generate your affiliate URL before sharing it with others.
More You Help Your Friend To Purchase Through Flipkart The More You Earn.

How To Promote Affiliate Products Using Banners/Widgets ?
Note : This Is Not Important.
All you have to do is, whenever your friend, you or someone is making purchase through flipkart. Copy that product URL from browser and generate your affiliate link and share it with the person who is purchasing that product. Once they make a purchase through your affiliate link you get paid.
This is really simple and i follow the same. I mean instead of making you links and uploading everywher on internet make it when you need and share.
In Flipkart affiliate program, you have more options to make money by displaying the banners, widgets and more promotion tools for your website. Once your visitor buys a product in Flipkart by clicking the banner displayed on your website, your commission goes to your affiliate account.
To get banner codes and widget codes, hover over “Affiliate tools” and choose any category you would like to.
9-14-2014 2-27-57 PM
There are several categories available under Affiliate tools. Just navigate to those tools and find the best banner/widget/search bar for your site. Once you find the suitable banner/widget, click “Get Code”, copy & paste it on your website where ever you want. Make sure the banner/widget is visible to all your website visitors.
Need Some Help Write It In Comments.

Saturday, 6 December 2014

Home Made USB Lamp

Self Made Small USB Lamp Out of old wasted zero bulb......
Working in awesome condition.... 
can be used @ night to provide light on your keyboard.


Tuesday, 4 November 2014

Avast Endpoint Protection Suite v8.0.1603 + License

DOWNLOAD


avast_summary.png

avast_license.png


avast! Endpoint Protection Suite is a powerful antivirus solution that can protect against malware and can provide users with remote control over other PCs. Your business deserves your attention – not your security. To save time and keep your business safe, use this award-winning security with centralized management.

Features

Pay only for features you need
Avast Endpoint Protection provides powerful security for all your endpoint PCs – without you having to pay anything extra for server protection.

Certified, fast, and light on system resources
Built upon our certified and award-winning antivirus engine, Avast Endpoint Protection provides not only strong protection but also Web-based central management/updating, remote installation, real-time security alerts, scheduled automatic scanning, and more.

Benefit from real-time protection
Your database will be continuously updated with the latest definitions in real-time via a connection to the Avast Virus Lab, rather than needing to wait for a traditional database update.

Save time and costs with remote management
Install and update remotely, to save both time and costs associated with traditional deployment at individual endpoints. For greater flexibility, we offer two management console options – our simple Small Office Administration for basic networks or our robust Enterprise Administration for complex networks.

Maximize productivity
Schedule scans, updates, and tasks for when employees don̢۪t need to use their PCs to ensure that productivity isn̢۪t hindered by maintenance. Maintaining your business security has never been more intuitive, worry-free, or efficient.

Monday, 8 September 2014

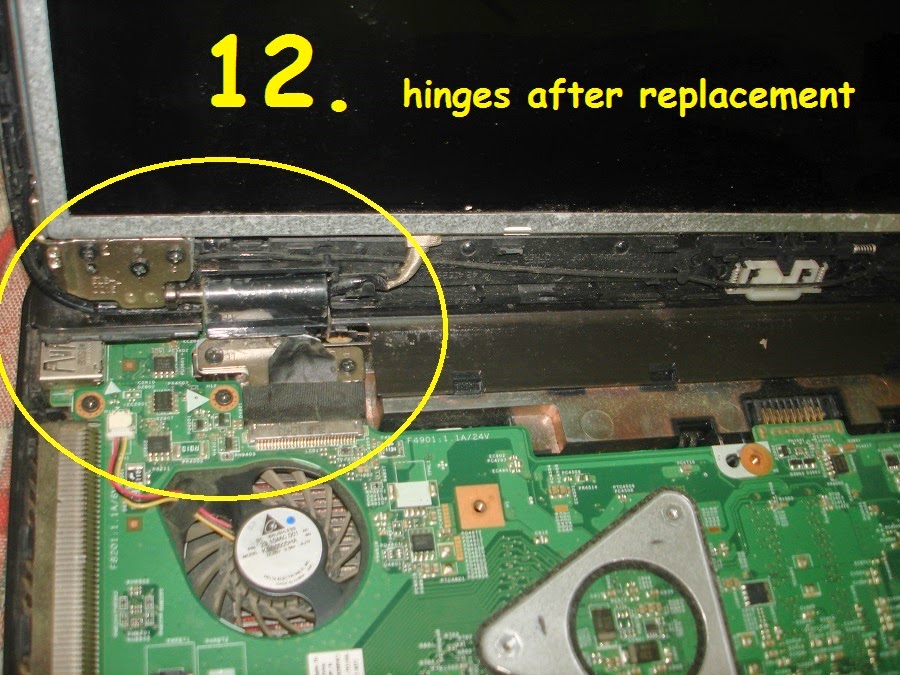
Dell Inspiron N5110, Laptop Broken Hinge Replacement with photos

Dell Inspiron N5110


Laptop Broken Hinge Replacement

14 PICS BEFORE & AFTER THE REPLACEMENT


Wednesday, 3 September 2014

Tuesday, 10 June 2014

The Complete List of MS Excel Function Key (F1 to F12) Shortcuts


Function-Keys
MS Excel is huge in terms of its underlying features and functions. So are the keyboard shortcuts in it. The list can go on and on. What we will do is limit our scope and concentrate only on Function Keys today. We will try and learn the actions associated with F1 through F12, standalone and in combination with keys like Alt, Ctrl and Shift.
Must Read: If you wish to explore basic and general uses of function keys read out post on the best and default uses of function keys.

F1

Shortcut KeyAction
F1Opens the help menu.
Ctrl + F1Hide/Unhide the taskbar.
Alt + F1Create a chart from data in the selected range.
Alt + Shift + F1Create a new worksheet.
Ctrl + Shift + F1Hide/Unhide ribbon and taskbar.

F2

Shortcut KeyAction
F2Activates the selected cell for editing.
Ctrl + F2Open print options.
Alt + F2Open file save as modal window.
Shift + F2Insert/Edit comment on selected cell.
Alt + Shift + F2Save the current workbook.

F3

Shortcut KeyAction
F3Paste a defined name into a formula.
Ctrl + F3Open name manager dialog box.
Shift + F3Open function insert dialog box.
Ctrl + Shift + F3Create names by using row and column labels.

F4

Shortcut KeyAction
F4Repeat last action (if possible, example Paste)
Ctrl + F4Close the current workbook.
Alt + F4Gives option to save or discard current changes.
Shift + F4Select cell next-right to current. Selection toggles only until the cell that contains data, then goes to the next row.
Ctrl + Shift + F4Like Shift + F4. But movement is left and then to the above row.

F5

Shortcut KeyAction
F5Open Goto dialog box.
Ctrl + F5Restore selected workbook window.
Shift + F5Open Find/Replace dialog box.

F6

Shortcut KeyAction
F6Switch between the Help task pane and the application window. Switch to the next pane in a worksheet that has been split.
Ctrl + F6Switch to the next workbook window when more than one workbook window is open.
Shift + F6Switch to the previous pane in a worksheet that has been split.
Ctrl + Shift + F6Switch to the previous workbook window when more than one workbook window is open.

F7

Shortcut KeyAction
F7Perform spell check in the selected range.
Ctrl + F7Activate move window cursor provided window is not maximized.
Shift + F7Open thesaurus.

F8

Shortcut KeyAction
F8Turn extend selection mode on/off.
Ctrl + F8Activate resize window cursor provided window is not maximized.
Alt + F8Open Macro management dialog box.
Shift + F8Enable Add to Selection mode- select non-adjacent cells when enabled.

F9

Shortcut KeyAction
F9Refreshes workbook. Performs calculations on formulas.
Ctrl + F9Minimize workbook.
Shift + F9Calculate the active worksheet
Ctrl + Alt + F9Calculate all worksheets in all open workbooks, regardless of whether they have changed since the last calculation.
Ctrl + Alt + Shift + F9Recheck dependent formulas, and then calculates all cells in all open workbooks.

F10

Shortcut KeyAction
F10Select the menu bar and close an open menu and submenu at the same time.
Ctrl + F10Maximize or restore the selected workbook window.
Shift + F10Display the shortcut menu for the selected item.
Alt + Shift + F10Display the menu or message for a smart tag.

F11

Shortcut KeyAction
F11Create a chart of the data in the selected range.
Ctrl + F11Create new worksheet with name like Macro1, Macro2…
Alt + F11Switch between the visual basic editor and the active workbook.
Shift + F11Create a new worksheet.
Alt + Shift + F11Open MS script editor.

F12

Shortcut KeyAction
F12Open save as dialog box.
Ctrl + F12Open the open menu.
Shift + F12Save the current workbook.
Ctrl + Shift + F12Open the print menu.

How To Create Bootable Windows ISO From Files/Folders

How To Create Bootable Windows ISO From Files/Folders

A couple of weeks ago, I downloaded Windows 7 SP1 Ultimate 64-bit ISO on my Windows 8.1 PC from Microsoft (using my MSDN subscription) and installed Windows 7 in dual-boot with Windows 8.1 using my USB flash drive as bootable media. The installation was uneventful and Windows 7 has been running as it should.
Two days back, I decided to free up some disk space on my Windows 8.1 drive and manually deleted all contents in the Downloads folder and also uninstalled tens of programs that I had installed over the last three months. After gaining GBs of disk space, I realized that the previously downloaded Windows 7 SP1 ISO, which was present in the Downloads folder, has also been deleted along with other files.
Even though I could easily download Windows 7 SP1 ISO pack again in a couple of minutes, I decided to create an ISO file from the bootable Windows 7 USB drive that I had prepared to install Windows 7. Preparing abootable Windows ISO from installation files/folders is relatively easy and doesn’t take much time either. In short, if have Windows installation files and want to create an ISO image file out of it, you can do so in a few minutes.

Make bootable ISO from installation files:

NOTE: This method is applicable to Windows 7/8/8.1 and later versions.
In this guide, I will show you how you can create a bootable Windows 7/8/8.1 ISO image file from Windows installation files.
Step 1: If all the installation files are in a folder on your PC, you can skip to the next step. And if the files and folders on USB drive, connect the USB flash drive containing Windows installation files to a PC running Windows 7/8/8.1 and copy all the contents from the USB to a newly created folder on desktop or any other location.
Create bootable Window ISO from USB step2 
Step 2: Visit the above download page and download ImgBurn software. ImgBurn is a free burning software but the setup offers you install Skype and Mobogenie during the installation. Make sure to select appropriate options to install the software without Skype and Mobogenie.
Create bootable ISO from USB
Step 3: Launch ImgBurn. Click on Create image file from files/folders option.
Create bootable Window ISO from USB step3
Step 4: In the resulting ImgBurn dialog, click on the small folder icon (see picture) next to the Source box to browse to the folder containing all copied files from the bootable Windows USB. Browse to the folder and then click Select folder.
Create bootable Window ISO from USB step4
Step 5: Next, click on the browse icon located next to Destination box to select a location to save the bootable ISO image file that you’re preparing now. Select a location and click Save button.
Create bootable Window ISO from USB step4
Step 6: On the right-side, switch to the Advanced tab (see picture) to see four tabs. Here, click on the tab labelled Bootable Disc.
Step 7: Now, select the option labelled Make Image Bootable, select Emulation type as None (custom), and type 8 in the Sectors to load box by removing the existing 4. Note that if you’re preparing a bootable Vista ISO, you need to keep the 4. For Windows 7, Windows 8 and Windows 8.1, you need to type 8 in the Sectors to load field.
Create bootable Window ISO from USB step4
Step 8: Click on the small folder icon next to Boot Image box (see picture) and then browse to the folder containing Windows installation files (the folder that contains files copied from the USB), open Boot folder, select etfsboot.com file, and then click Open button to select etfsboot.com as the boot image file. We are almost done!
Create bootable Window ISO from USB step6
Step 9: Finally, click on the Build button (see picture) to begin creating your bootable Windows ISO image file. Upon clicking the Build button, three dialog boxes will appear one after another. Simply click Yes button when you see the first dialog, OK button when you see the second, and then, Yes button again when you see the last dialog.
Create bootable Window ISO from USB step5
ImageBurn4
Create bootable Window ISO from USB step9
Once the bootable ISO image is ready, you’ll see “Operation successfully completed” message.
Bootable Windows ISO from USB last step

like